hexo博客搭建指北

文章目录
【注意】最后更新于 August 13, 2020,文中内容可能已过时,请谨慎使用。
折腾了 $3$ 天终于把博客搭建好了…本文会简单介绍一下 hexo 博客的搭建,并选取一些我自己在配置博客的过程中遇到的问题,说明一下我的解决方案。
实际上,hexo 博客的搭建并不难,难搞的是美化,我在这个过程中遇到了很多问题,不可能在这篇博客中全部陈述出来,最重要的还是勤于百度。
warning
本博客已从 hexo 迁移至 hugo,详见 从 hexo 到 hugo 。
博客的搭建
先推荐两篇比较好的教程:搭建个人博客-hexo+github详细完整步骤,使用github+Hexo人人都能拥有一个美美的博客。
这部分网上讲的已经比较好了,我在这就简单说一下。
安装软件
下载安装即可…
本地设置
装好之后,在本地创建一个文件夹,下文中称其为“根目录”。
下文中“输入命令”均指在命令行中输入命令(并回车
废话),既可以使用 git bash,也可以使用 cmd 或 powershell 。输入命令时若无特别说明都需要 cd 到根目录下。
输入命令 npm install -g hexo 来安装 hexo 。
输入命令 hexo init 来初始化 hexo 。
输入命令 npm install 来安装一些需要的包。
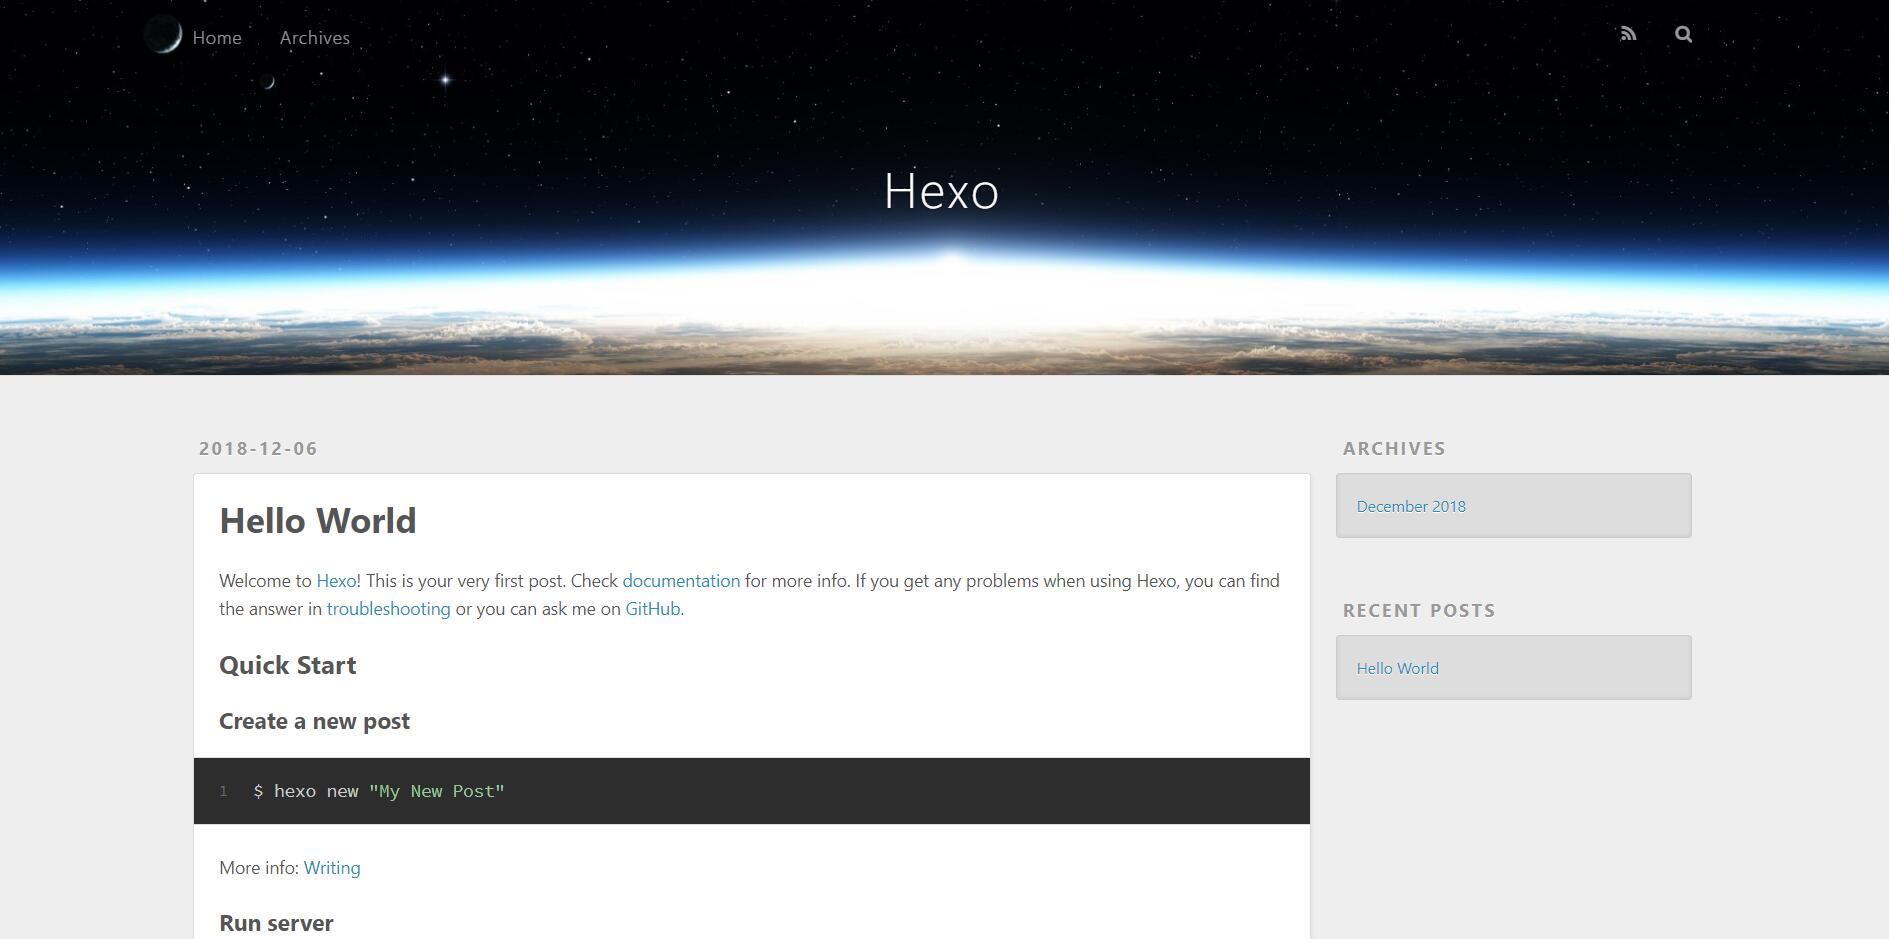
输入命令 hexo s,并在浏览器打开 localhost:4000,在本地预览博客;如果上文步骤进行正确,应该看到一个类似于这样的页面:
注:命令可以缩写,条件是没有开头几个字母相同的其它命令。
hexo s实际上是hexo server的缩写;下文中hexo d是hexo deploy的缩写,hexo g是hexo generate的缩写;hexo clean不能缩写为hexo c,因为存在命令hexo config,但是可以缩写为hexo cl。
按 Ctrl+C 关闭 server 以继续操作。(若出现类似于 终止批处理操作吗(Y/N)? 的提示,输入 y 即可。)
接着安装博客的主题,可以在 hexo 官网 选择主题下载,本篇教程推荐使用 NexT 主题。
在 hexo 官网 点击图片下方蓝色的文字即可打开主题的 GitHub 主页,一般来说,一个主题的 GitHub 主页上是有用于安装的命令以及配置博客的教程的。
如果没有的话(或者即使有也一样),你应该输入命令 git clone 主题的Github主页地址 themes/主题名 。例如:git clone https://github.com/theme-next/hexo-theme-next themes/next 。
当然,你也可以使用默认的 landscape 主题,从而不用额外下载主题。
下载好主题后,用任何一款文本编辑器(记事本也可以),打开根目录下的 _config.yml ,将 theme: landscape 修改为 theme: 你想用的主题名 即可。
配置 GitHub 仓库
首先你需要有一个 GitHub 账号。
然后点击右上角你的头像,打开“Your repositories”,点击绿色的按钮“New”。
在"Repository name”一栏填入 yourname.github.io (“yourname”指你的 GitHub ID,比如我就填 ouuan.github.io),“Description"可以随便填也可以不填,然后点绿色的按钮“Create repository”。
将博客上传至 GitHub
输入命令 ssh-keygen 来生成 SSH,让你输入东西你就空着,按回车(应该要按三次回车)。
然后用任意的文本编辑器打开 C:\Users\电脑用户名\.ssh\id_rsa.pub(如果装了 vim 可以直接输入命令 vim ~/.ssh/id_rsa.pub),复制里面的内容。
打开 GitHub,点击右上角的头像,打开“Settings”,选择左边的“SSH and GPG keys”,点绿色的按钮“New SSH key”,Title 随便填,下面的 Key 把刚才复制的东西粘贴进去,然后点绿色的按钮“Add SSH key”。过程中可能需要输入密码。
输入命令 ssh -T git@github.com ,若出现 Hi yourname! You've successfully authenticated, but GitHub does not provide shell access. 表示 SSH 配置成功。
输入命令 npm install hexo-deployer-git --save 安装 deployer 。
打开根目录下的 _config.yml ,将最后几行改为:
deploy:
  type: git
  repository: https://github.com/yourname/yourname.github.io.git
  branch: master
当然"yourname"要改成你的 GitHub ID 。
依次输入命令:
hexo clean
hexo g
hexo d
这一步可能要输入密码。
等几分钟,再用浏览器打开 yourname.github.io ,应该就可以看到你的博客了。(此时别人也可以通过这个网址看到你的博客。)
博客的配置与美化
根目录下的 _config.yml
这部分参考官网教程即可。
建议不要像我一样 permalink 设成 title/…博客写多了之后,如果博客全放在根目录,就会非常自闭。(试想一下你哪天写到了 1000 篇博客,然后打开博客 repo,显示 Sorry, we had to truncate this directory to 1,000 files.,整个页面都是乱七八糟的博文名称)。可以设成 blog/title 之类的,总之不要全放根目录。
可以在 highlight.tab_replace 设置将缩进替换为什么,默认是长度为八空格的制表符。例如:
highlight:
  enable: true
  line_number: true
  auto_detect: false
  tab_replace: '    '
主题目录下的 _config.yml
主题目录下的 _config.yml 指 \themes\主题名\_config.yml。
这里以 NexT 主题(本文基于 NexT 6.6,其它版本可能有些区别)为例,这个主题的 _config.yml 非常完备,修改配置基本上只需删除/添加注释符号 # 以及改变 true/false 即可。
选择 NexT 主题的四种之一
# Schemes
scheme: Muse
#scheme: Mist
#scheme: Pisces
#scheme: Gemini
将想用的主题前的 # 删掉,在 scheme: Muse 前加上 # 即可。
例如:
# Schemes
#scheme: Muse
#scheme: Mist
#scheme: Pisces
scheme: Gemini
四种主题的预览在 NexT 主题的官网有。
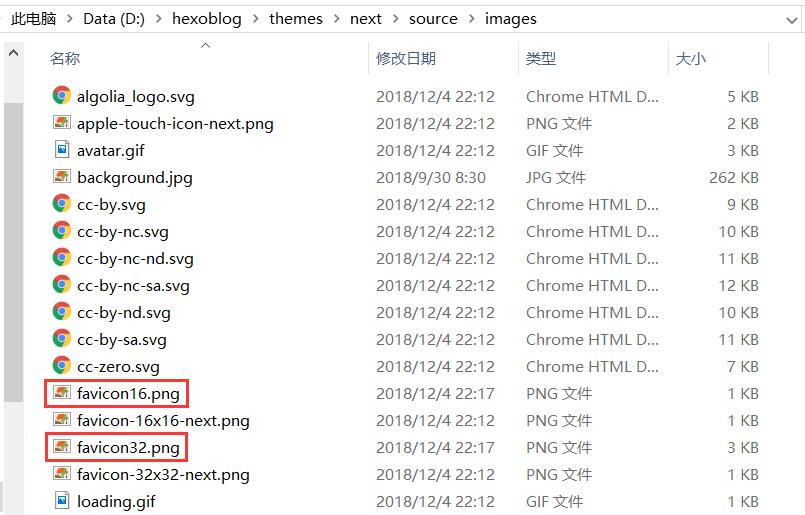
改变网站图标
favicon:
  small: /images/favicon-16x16-next.png
  medium: /images/favicon-32x32-next.png
  apple_touch_icon: /images/apple-touch-icon-next.png
  safari_pinned_tab: /images/logo.svg
将你想用的图标放在 \themes\next\source\images 里,然后修改上面的文件名即可。
例如:
favicon:
  small: /images/favicon16.png
  medium: /images/favicon32.png

页脚设置
footer:
  # Specify the date when the site was setup.
  # If not defined, current year will be used.
  #since: 2015

  # Icon between year and copyright info.
  icon:
    # Icon name in fontawesome, see: https://fontawesome.com/v4.7.0/icons
    # `heart` is recommended with animation in red (#ff0000).
    name: battery-full
    # If you want to animate the icon, set it to true.
    animated: false
    # Change the color of icon, using Hex Code.
    color: "#808080"

  # If not defined, will be used `author` from Hexo main config.
  copyright:
  # -------------------------------------------------------------
  powered:
    # Hexo link (Powered by Hexo).
    enable: false
    # Version info of Hexo after Hexo link (vX.X.X).
    version: true

  theme:
    # Theme & scheme info link (Theme - NexT.scheme).
    enable: true
    # Version info of NexT after scheme info (vX.X.X).
    version: true
  # -------------------------------------------------------------
  # Beian icp information for Chinese users. In China, every legal website should have a beian icp in website footer.
  # http://www.miitbeian.gov.cn
  beian:
    enable: false
    icp:
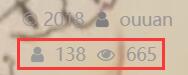
icon: © 2019 与用户名之间的图标。(图中 $1$)
图标名称为 Font Awesome 上的图标名称。
powered.enable:为 true 则会显示“由 Hexo 强力驱动”。(图中 $2$)
powered.version:为 true 则会显示 Hexo 的版本。(图中 $3$)
theme.enable:为 true 则会显示“主题 – NexT.XX”。(图中 $4$)
theme.version:为 true 则会显示主题的版本。(图中 $5$)
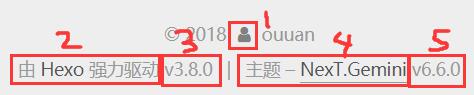
注:根据 NexT 主题的 LICENSE,footer 中必须开启 theme.enable 选项。
“关于”&“标签”
menu:
  home: / || home
  about: /about/ || user
  tags: /tags/ || tags
  #categories: /categories/ || th
  archives: /archives/ || archive
  #schedule: /schedule/ || calendar
  #sitemap: /sitemap.xml || sitemap
  #commonweal: /404/ || heartbeat
将需要的项目取消注释即可在侧边栏显示。
如果需要使用“关于”页面,输入命令 hexo new page "about"。
然后在 \source\about\index.md 中就可以编辑“关于”页面了。
可以修改 \source\about\index.md 中的 title 项来显示“关于”而非“about”。
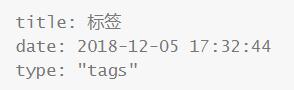
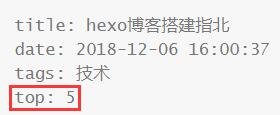
如果需要使用“标签”功能,需要在博文中添加选项 tags :
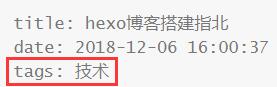
如果有多个标签,每行一个,以 - 开头:
tags:
- 标签1
- 标签2
- 标签3
如果需要使用“标签”页面,输入命令 hexo new page "tags"。
然后向 source\tags\index.md 中添加一行:
type: "tags"
“分类”与“标签”类似。
站内搜索
输入命令 npm install hexo-generator-searchdb --save 安装所需的库。
在根目录下的 _config.yml 的结尾加入:
search:
  path: search.xml
  field: post
  format: html
  limit: 10000
然后在 \themes\next\_config.yml 中,打开 local_search:
local_search:
  enable: true
社交网站
# Social Links.
# Usage: `Key: permalink || icon`
# Key is the link label showing to end users.
# Value before `||` delimeter is the target permalink.
# Value after `||` delimeter is the name of FontAwesome icon. If icon (with or without delimeter) is not specified, globe icon will be loaded.
social:
  GitHub: https://github.com/ouuan || github
  洛谷: https://www.luogu.org/space/show?uid=49742 || code
  Codeforces: https://www.codeforces.com/profile/ouuan || code
  b站: https://space.bilibili.com/11067182 || tv

social_icons:
  enable: true
  icons_only: false
  transition: false
在 social 下每行一个,格式为:名称: 地址 || 图标。
其中,“图标”为 Font Awesome 图标名称,但有些图标是不可用的,而且图标也不全,使用的时候要尝试一下图标是否可用。
social_icons:
  enable: false
这样设置可以只显示名称不显示图标。
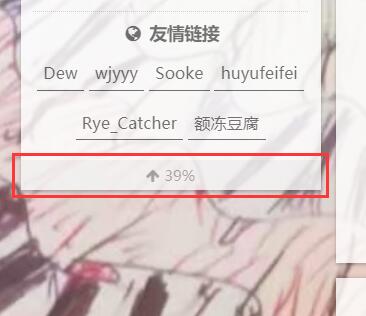
友情链接(或其它链接)
# Blog rolls
links_icon: globe
links_title: 友情链接
# links_layout: block
links_layout: inline
links:
  Dew: https://www.cnblogs.com/ppprseter/
  wjyyy: https://www.wjyyy.top/
  Sooke: https://www.luogu.org/blog/Sooke/
  huyufeifei: https://www.cnblogs.com/huyufeifei/
  Rye_Catcher: https://rye-catcher.github.io/
  额冻豆腐: http://www.mayflyyh.com/
links_icon:显示在标题前的图标。
links_title:标题。
links_layout:block 一行一个,inline 一行多个。
links:要显示的链接以及名称。
头像
# Sidebar Avatar
avatar:
  # in theme directory(source/images): /images/avatar.gif
  # in site  directory(source/uploads): /uploads/avatar.gif
  # You can also use other linking images.
  url: /images/avatar.jpg
  # If true, the avatar would be dispalyed in circle.
  rounded: true
  # The value of opacity should be choose from 0 to 1 to set the opacity of the avatar.
  opacity: 1
  # If true, the avatar would be rotated with the cursor.
  rotated: false
url:头像地址,留空则不显示头像。
rounded:圆/方头像。
opacity:不透明度。
rotated:随光标旋转。
回到顶部按钮/阅读百分比
  # Back to top in sidebar (only for Pisces | Gemini).
  b2t: true

  # Scroll percent label in b2t button.
  scrollpercent: true
博客首页不显示全文
在博文里可以用 <!-- more --> 来标识在首页显示到哪为止。
可以在 \themes\next\_config.yml 里设置到一定字数自动不显示全文:
# Automatically Excerpt. Not recommend.
# Please use <!-- more --> in the post to control excerpt accurately.
auto_excerpt:
  enable: true
  length: 150

# Read more button
# If true, the read more button would be displayed in excerpt section
read_more_btn: true
length:不显示全文的字数上限。
read_more_btn: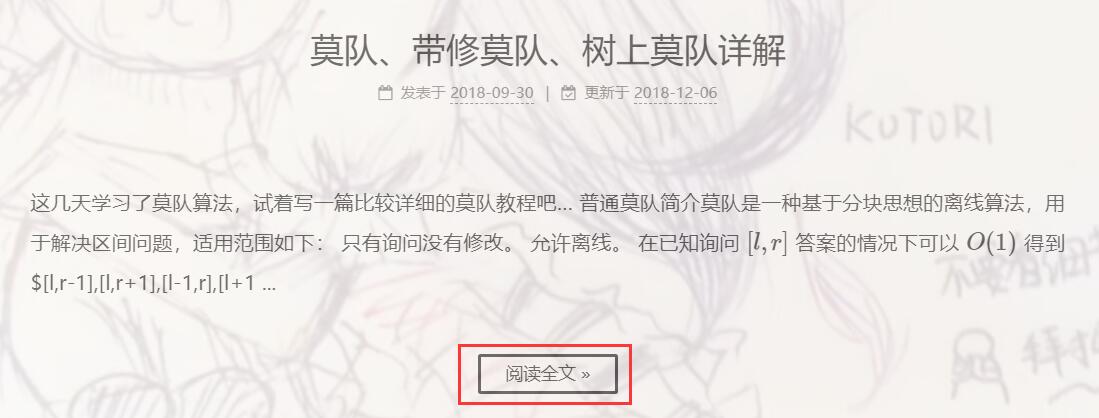
代码块复制按钮
codeblock:
  # Manual define the border radius in codeblock
  # Leave it empty for the default 1
  border_radius:
  # Add copy button on codeblock
  copy_button:
    enable: true
    # Show text copy result
    show_result: true
enable:启用复制按钮。
show_result: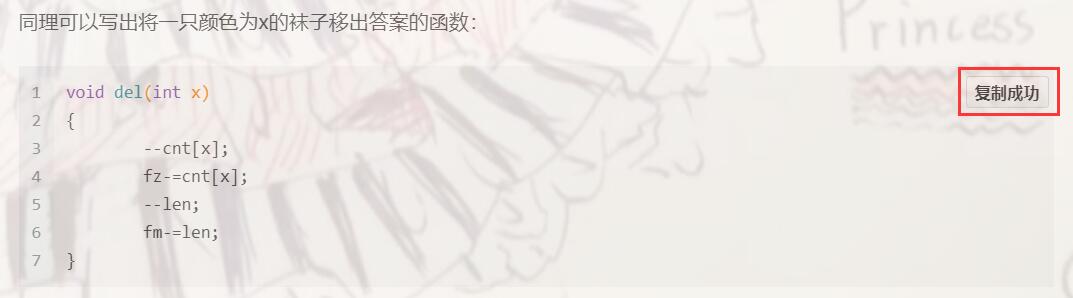
$\LaTeX$
# Math Equations Render Support
math:
  enable: true

  # Default(true) will load mathjax/katex script on demand
  # That is it only render those page who has 'mathjax: true' in Front Matter.
  # If you set it to false, it will load mathjax/katex srcipt EVERY PAGE.
  per_page: false

  engine: mathjax
  #engine: katex
enable:启用 $\LaTeX$ 。
per_page:为 true 则只有博文中有 mathjax: true 才会启用 $\LaTeX$,否则每篇博客都会启用 $\LaTeX$ 。
engine:推荐使用 mathjax 。
hexo 博客的 mathjax 和 Markdown 有一些冲突,将在后文专门讲解如何解决冲突。
访客统计
busuanzi_count:
  enable: true

书签
书签的功能是关闭页面/手动点击书签按钮时,保存这篇博客看到的位置,下次点进这篇博客时继续从这个位置开始。
安装插件:git clone https://github.com/theme-next/theme-next-bookmark.git source/lib/bookmark
更改 \themes\next\_config.yml:
# Bookmark Support
# Dependencies: https://github.com/theme-next/theme-next-bookmark
bookmark:
  enable: true
  # if auto
  #   - save the reading position when closing the page
  #   - or clicking the bookmark-icon
  # if manual, only save it by clicking the bookmark-icon
  save: manual
其它配置
博客背景
打开 \themes\next\source\css\_custom\custom.styl,输入:
body {
    background-image:url(/images/background.jpg);
    background-size: cover;
}
把背景图片重命名为 background.jpg,放入 \themes\source\images(当然也可以更改background-image:url())。
background-size: cover; 表示宽度缩放至页面大小。
body {
    background-image:url(/images/background.jpg);
    background-repeat: no-repeat;
    background-attachment:fixed;
    background-size: cover;
}
如果修改成这样的话背景图片就不会滚动。
如果不想让博客内容挡住背景,可以设置博客内容的透明度,在 \themes\next\source\css\_custom\custom.styl 中加入下面的代码即可:
.main-inner {
    opacity: 0.9;
}
评论功能
由于 Gitalk 存在一些安全性的问题(OAuth App 的 client_id 和 client_secret 是可见的、访客需要授予读写自己的 repo 的权限),并且稳定性较差,推荐使用 utterances。
在 https://utteranc.es/ 中进行设置,将配置代码放到 \themes\next\layout\_partials\comments.swig 中即可,如:
{% if page.comments %}

  <div class="comments">
    <script src="https://utteranc.es/client.js"
        repo="ouuan/blog-comments"
        issue-term="title"
        label="utterances"
        theme="github-light"
        crossorigin="anonymous"
        async>
    </script>
  </div>

  {% if theme.facebook_sdk.enable and theme.facebook_comments_plugin.enable %}

  ...
其实也可以安装 hexo-next-utteranc 插件,但没必要。
另外,用于存放 issue 的 repo 需要安装 utterances app。
博文自定义排序
打开 \node_modules\hexo-generator-index\lib\generator.js 。
在末尾添加如下代码:
  posts.data = posts.data.sort(function(a, b) {
      if(a.top && b.top) {
          if(a.top == b.top) return b.date - a.date;
          else return b.top - a.top;
      }
      else if(a.top && !b.top) {
          return -1;
      }
      else if(!a.top && b.top) {
          return 1;
      }
      else return b.date - a.date;
  });
在博文设置中加入 top: x 即可,会以 top 为第一关键字,时间为第二关键字排序。若 top 为空则视作 -INF 。
折叠块
README.md
如果想在 https://github.com/yourname/yourname.github.io 让别人看到你的博客的简介,就需要写一个 README.md 放在根目录下的 source 文件夹内。
然而,只是这样的话, README.md 会被渲染成 html,所以需要更改根目录下 _config.yml 的设置:
skip_render: README.md
自定义404页面
首先写一个 \source\404.html 。
至于怎么写html..这里地方太小写不下。
**需要注意的是,一个真正的 404 页面应当在访问时返回 404 代码。**在 HTML 中,可以使用 <meta http-equiv="Content-Security-Policy" content="connect-src 'self'"> 实现。(似乎不加这个也会返回 404?不是特别清楚。)
可以参考一下我的:
<html>
    <head>
        <meta http-equiv="Content-type" content="text/html; charset=utf-8">
        <meta http-equiv="Content-Security-Policy" content="connect-src 'self'">
        <title>404 Error | ouuan的博客</title>
        <link rel="icon" type="image/png" sizes="32x32" href="/favicon-32x32.png">
        <link rel="icon" type="image/png" sizes="16x16" href="/favicon-16x16.png">
    </head>
    <body>
        <div>
            <p style="text-align: center;"><strong>您可能访问了错误的网址</strong><img src="/images/5bd4705dd844f.jpg"></p>
            <br><br>
            <p style="text-align: center;"><strong>您现在可以:</strong></p>
            <p style="text-align: center;"><a href="/"><strong>回到博客主页</strong></a></p>
            <p style="text-align: center;"><a href="javascript:history.go(-1);"><strong>返回上一页</strong></a></p>
            <br><br>
            <p style="text-align: center;"><strong>如果您在登录 Gitalk 时遇到此问题,请尝试<a href="/%E5%A5%BD%E7%94%A8%E7%9A%84%E7%BD%91%E7%AB%99/">换一篇博客</a>登录</strong></p>
        </div>
    </body>
</html>
然后,如果直接这样发布,html 会被渲染,就跟一个自定义页面(hexo new page)一样了。
所以要修改根目录下的 _config.yml,在 skip_render: 后添加 404.html,如果有多项用 - 隔开:
skip_render:
 - README.md
 - 404.html
发布完成后,访问一个错误的网址,比如 你的域名/qaq 就可以查看效果了。
一言(ヒトコト)
大约是这个。
网上没找到教程,自己随便瞎研究了一波,所以方法比较丑陋,仅供参考..
本来想稍微写一下自己研究的经过,想了想自己也没完全搞清楚,就来一波授人以鱼吧…
\themes\next\layout\_macro\sidebar.swig:
……
<aside id="sidebar" class="sidebar">
<div class="sidebar-inner">
<div class="hitokoto-block">
<div class="hitokoto-inner hitokoto-comma hitokoto-left-comma">“</div>
<div class="hitokoto-inner hitokoto-content"><b><span><span id="hitokoto-content"></span></span></b></div>
<div class="hitokoto-inner hitokoto-comma hitokoto-right-comma">”</div>
</div>
<div id="hitokoto-from"></div>
<div class="hitokoto-bottom">
<a id="hitokoto-link" href="https://hitokoto.cn/">Hitokoto</a>
<button id="hitokoto-like" title="通过给句子点赞可以增加其出现概率,由于技术原因并不能在博客中显示赞数与点赞是否成功的信息(红心表示成功发送点赞请求,但如果同 IP 重复点赞就会失败),如需查看可以点击左边的“Hitokoto”链接。"><i class="menu-item-icon fa fa-fw fa-heart"></i></button>
</div>
</div>
<div style="height: 15px"></div>
{% if theme.sidebar.onmobile %}
……
\themes\next\layout\_scripts\commons.swig:
……
<script type="text/javascript">
  function hitokotoLike(x, y) {
		$.ajax({
		    url: "https://hitokoto.cn/Like",
		    type: "GET",
		    data: "ID=" + x,
		    dataType: "jsonp",
		    success: function(data) {
		        alert(data.message);
		        $(y).css('color', 'red');
		    },
		    error: function() {
		        console.log('Hitokoto Like Request Error.');
		        $(y).css('color', 'red');
		    }
		});
	}
	$.get('https://v1.hitokoto.cn/?c=a', function(data) {
		$('#hitokoto-content').css('display', '').text(data.hitokoto);
		$('#hitokoto-from').css('display', '').text('——' + data.from);
		$('#hitokoto-from').attr('title', '上传者: ' + data.creator);
		$('#hitokoto-link').attr('href', 'https://hitokoto.cn/?id=' + data.id);
		document.getElementById('hitokoto-like').onclick = function() { hitokotoLike(data.id, '#hitokoto-like'); }
	});
</script>
\themes\next\source\css\_custom\custom.styl:
……
.sidebar {
	background: rgba(0, 0, 0, 0);
}

.hitokoto-block {
    width: 200px;
    display: table;
    padding: 0 10px;
}

.hitokoto-inner {
	text-align: left;
    display: table-cell;
}

.hitokoto-comma {
	color: #B2B7F2;
	font-size: 24px;
	font-weight: bold;
	font-family: 'Times New Roman', serif;
}

.hitokoto-left-comma {
	vertical-align: top;
}

.hitokoto-right-comma {
	vertical-align: bottom;
}

.hitokoto-content {
	width: 176px;
	color: burlywood;
	text-indent: 2em;
    vertical-align: middle;
	padding: 0.8em 0.2em 1em 0.2em;
}

#hitokoto-from {
	text-align: right;
	font-size: 0.8em;
	color: black;
}

.hitokoto-bottom {
	margin-top: 15px;
	font-size: 0.8em;
	color: black;
}
大约就这样,省略号表示文件中本来就有的其它部分。不保证在其他人电脑上可以用。大致思路就是搞个空 div 指定一个 id,用 js 往里面塞东西。所以即使我这个“鱼”不能直接用大约也是可以稍微研究研究来用的。
博文复制提醒
在 \themes\next\layout\_scripts\commons.swig 中加入:
<script type="text/javascript">
	$('.post-body').bind('copy', function() {
		alert('本博客内容欢迎分享(将本博客的原文地址分享到其它网站),允许部分摘录并在醒目位置附上原文链接,未经许可禁止任何形式的全文转载。');
	});
</script>
更改 CSS
大概按照 谢益辉博客 魔改了一下。
Emoji
详见 crimx/hexo-filter-github-emojis 🤔 。
安装的时候遇到了一些问题,具体来说执行 npm install hexo-filter-github-emojis --save 不会安装 peer dependencies,需要手动安装(从警告信息就可以看出需要安装哪些)。而在安装 canvas 时出现错误,更新 node-pre-gyp 后得到了解决。
大约是为了保证用户能够看到,很多显示 emoji 的库(如 emojione)都是使用 cdn 加载图片,然而我还是觉得 Win 10 本身的 emoji 样式比较好看,Linux 的也不错,所以又稍微魔改了一下,改成了显示 Unicode 字符而非图片。具体来说,将 \node_modules\hexo-filter-github-emojis\index.js 中的 renderEmoji 函数中的全部内容替换成了 return emojis[name].codepoints ? emojis[name].codepoints.map(c => `&#x${c};`).join('') : ' '; 。
博客的写作
Markdown 的使用
网上有很多 Markdown 的学习资源,我自己是在洛谷剪贴板学会的。
我以前一般都用洛谷剪贴板编辑 Markdown,但 hexo 博客需要在本地编辑 .md 文件,这时普通的文本编辑器就不太方便了。我推荐 Typora 这款软件,还是挺方便的。
撰写博客前的准备
打开根目录下的 _config.yml ,将 post_asset_folder 设为 true。
这样就可以把图片放到博客里而不用其它图床了。
然后把 \source\_posts\hello-world.md 删除。
博文的撰写
新建一篇博客:hexo new "博文标题"。
然后等几秒钟,在 \source\_posts 文件夹下,就会生成 博客名 这个文件夹(如果你把 post_asset_folder 设为 true 了)以及 博客名.md。
撰写博客就是编辑 博客名.md。
这个文件的开头是博客的一些设置,可以在 \scaffolds\posts.md 中修改默认设置,我的默认设置是:
---
title: {{ title }}
date: {{ date }}
tags:
top:
---
然后就可以写 Markdown 格式的文章了。(top 是自定义文章排序,上文中介绍过)

需要注意的是,在洛谷代码块可以不加"cpp”,但在 hexo 上,一定要加上"cpp":
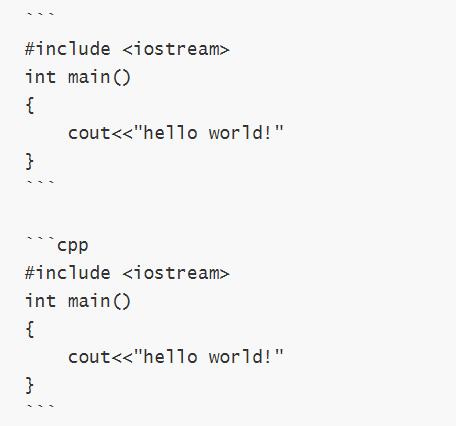
#include <iostream>
int main()
{
    cout<<"hello world!"
}
#include <iostream>
int main()
{
    cout<<"hello world!"
}
更多博文模板
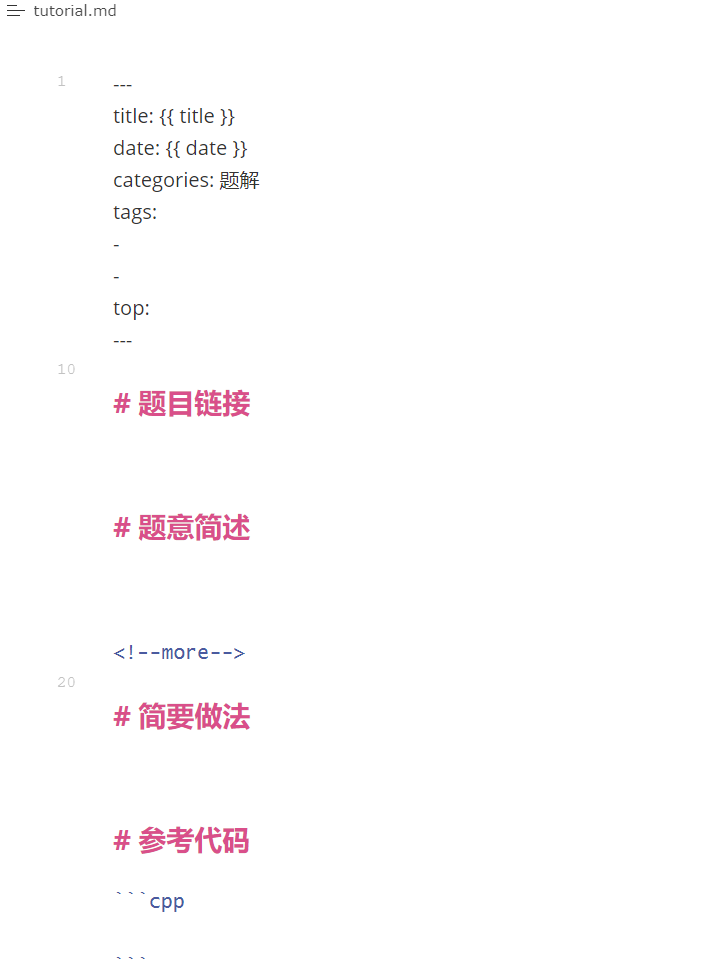
在 \scaffolds 文件夹中可以增加更多的模板,比如我就搞了一个 \scaffolds\tutorial.md,这样的话,新建一篇题解的时候输入命令 hexo new tutorial "博文标题" 就可以使用模板了。
引用本地图片
引用链接/网络上的图片格式与普通 Markdown 相同([链接名称](链接地址) 和 ),引用本地图片需要把 post_asset_folder 设为 true ,然后把图片放在与博客同名的文件夹中,然后只用  就可以引用了。
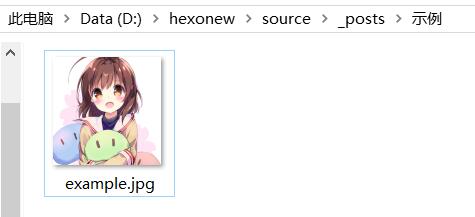
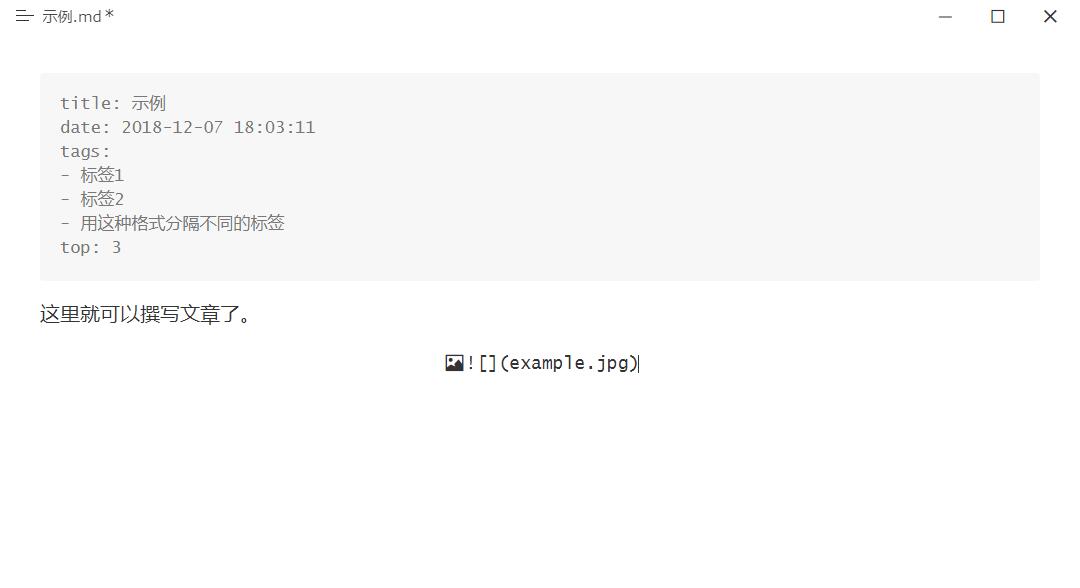
在编辑器里显示不出图片是正常的。
还有另一种方式引用图片,
用这种方式引用图片的话,把鼠标放在上面会显示图片描述(上面这张图就是用这种方式引用的)。
只有这种方式引用图片才能在博客首页正常显示图片,否则只能点进博客才能看到图片。
$\LaTeX$ 的使用
$\LaTeX$ 概述
$\LaTeX$ 主要用于编辑数学公式,十分方便,网上也有很多学习资源,比如:LaTeX数学公式大全。
在支持 $\LaTeX$ 的 Markdown 文档里,使用两个美元符号将 $\LaTeX$ 公式括起来,例如:
~~QAQ$f_i=\sum\limits_{j=1}^ia_j$f_i=\sum\limits_{j=1}^ia_j~~
QAQ$f_i=\sum\limits_{j=1}^ia_j$f_i=\sum\limits_{j=1}^ia_j
也可以用一对双美元符号使公式居中显示在单行,例如:
$f_i=1$

$$f_i=1$$
$f_i=1$
$$f_i=1$$
在 Typora 中使用 $\LaTeX$ 需要将设置中的"Markdown 扩展语法"全部勾选。
P.S. $\LaTeX$:
\LaTeX
启用 $\LaTeX$
在 \themes\next\_config.yml 中将 mathjax 设为 true,然后将 per_page 设为 false 或者在需要启用 \LaTeX 的博文开头加上 mathjax: true 。
解决冲突
由于hexo博客中即使是 $$ 内的字符也会被当成 Markdown 渲染,类似于 $f_{f_i}$、$a*b*c$、$[x,y](1<x<y<2)$ 之类的,都会被错误地渲染。
对于下划线,新版本的 marked 已经修复这一 bug(新版本的 hexo 或许已经不需要手动升级了),所以可以通过执行 npm install --save marked 和 npm install --save hexo-renderer-marked 解决。但同时,新版本的 marked 会将 \ 用作转义,所以 \\ 、 \{ 之类的要改成 \\\\ 、 \\{ 。
对于 *,建议使用 $\cdot$ ($a\cdot b$,一般用于表示乘积) 或 $\times$ ($n\times m$ 的矩阵,一般用于表示维度或者笛卡尔积)或 $\ast$ ($\mathbb{N}^\ast$,一般用于上标或表示卷积) 代替。其实也可以使用 $\*$ 来代替 $\ast$ 。
对于 $[x,y](1<x<y<2)$,在它们之间加上空格,即 $[x,y] (1<x<y<2)$ 就好了。
博客的发布
其实前文提到过,依次输入以下三条命令即可:
hexo cl
hexo g
hexo d
hexo cl 是可选的。加上不会有坏处..而且有时候必须加上。
发布之前还可以执行 hexo s 并在本地使用浏览器打开 localhost:4000 进行预览。
当然也可以使用 hexo g -d 命令。
评论正在加载中...如果评论较长时间无法加载,你可以 搜索对应的 issue 或者 新建一个 issue 。